Your cart is currently empty!
Author: Chris Curran
-
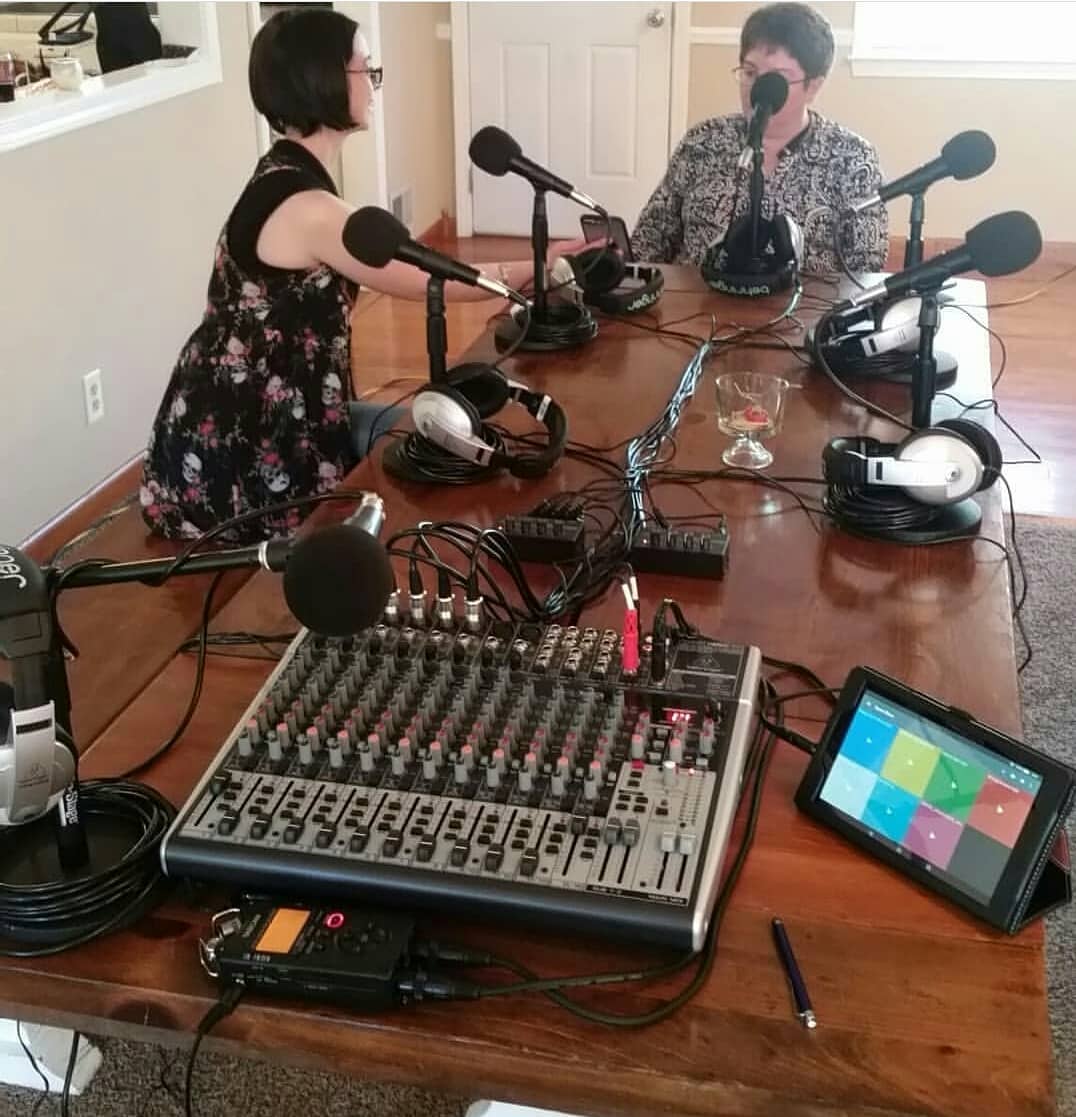
Shawn Kitchen – PES 131
My guest is Shawn Kitchen – host of the Northwest Corner Podcast. He lives in Spartanburg, SC, was formerly trained in radio and tv, and is currently records his show using a Live format to reduce post-production time.
We discussed his production workflow and equipment in detail, including:
- Using a Kindle tablet to play sound FX
- Riding faders Live
- Mixer has one knob compression on each channel
- Mic technique
- Using subgroups: Voices to one group, music to another group, then record each group separately on his Zoom H6
- Chris’s Compression Dynamics plugin within Audacity
- Noise reduction in Audacity by creating and using a custom noise profile (he removes 14 or 15 dB of noise!)
- Record everything 24 bit / 44.1 kHz
- Soundcloud
- Behringer X2222USB analog mixer
- Behringer UMC404HD interface
- Tascam DR-40 field recorder
- Zoom H6 field recorder
- Behringer XM8500 dynamic mics
- MXL FR-355K lavalier mics
- Audacity
- Hindenburg
- Soundpad app for Android on Kindle Fire 8HD tablet
- iRig 2 instrument interface
- Behringer headphone distribution amp and headphones (for up to 8 people)
- All post-production done in-house on Dell desktop with Core I5 processor using primarily Audacity, but have been using Hindenburg more frequently in recent time. Pre-recorded music tracks (except show theme) are separated into new tracks. All vocals are run through a combination of soft limiter, compression, and then amplification to -1.0 dB. Noise reduction is done at the *end* of all other processing, using a 5-second segment of silence with all mics open at the beginning of each recording session. I’ve found that applying noise reduction at the end yields us with the clearest results.
Thanks for being a great guest, Shawn!
Comment below with any questions or comments.
.
-
Guests Joining From Their Phone

There are various methods to connect a guest via their phone:
- An actual phone call
- Ringr app
- FaceTime (iPhones only)
- Skype
- Others
Except for an actual phone call, whichever method you use, be aware that if your guest speaks directly into the phone, without earbuds, and with the phone held up against their face, the audio will most likely distort due to their plosives. To avoid this have the guest use earbuds with a mic on them.
I recently tried to connect with a guest using FaceTime without earbuds and it was absolutely terrible and unusable audio.
BTW, the reason an actual phone call will not have a major problem with plosives is because that audio is being extremely compressed, limited and EQ’d.
Want to receive the Daily Goody in your email, daily or weekly? Subscribe free here.
And please keep in mind, the Daily Goody is only a tiny little tip, fact or lesson everyday. Please don’t expect any of these posts to be long, earth-shattering masterpieces that instantly answer every single question you can think of and completely transform you into a world class podcast engineer. “Little by little, a little becomes a lot.”
.
-
Scheps Omni Channel Plugin from Waves
This is definitely one of the most handy mixing plugins for podcasters because it has all the basic processors you might need to make voices and music sound their best, including:
- EQ
- Filters
- Compressor (3 flavors)
- Limiter
- De-esser (2 of them!)
- Expander/Gate
- Saturation
- Insert (to incorporate an additional plugin right within this one)
This plugin often goes on sale for $29! (normally it’s $99)
*Also, if you would love for me to optimize your voice by dialing in custom settings for your voice using the Scheps Omni Channel plugin, consider this:

Want to receive the Daily Goody in your email, daily or weekly? Subscribe free here.
And please keep in mind, the Daily Goody is only a tiny little tip, fact or lesson everyday. Please don’t expect any of these posts to be long, earth-shattering masterpieces that instantly answer every single question you can think of and completely transform you into a world class podcast engineer. “Little by little, a little becomes a lot.”
.
-
Behringer Ultravoice XM1800S Handheld Supercardioid Dynamic Microphone (Set of 3)
…for $39.99!!!
Yes, three mic’s for $39.99.
These mics are used by Glenn The Geek for his Horse Radio Network shows, and many other folks who need decent mics and need A LOT of them. Glenn has bought around 40 of these over the last few years because he has many hosts on his network. Plus, from time to time he does some live broadcasting on location and it’s good to have decent inexpensive mics and not have to worry about it being damaged or lost because each mic only costs around $13.
THE MAIN POINT: If you’re going to need lots of mics, you can’t buy all SM7b’s or RE20’s. Forty RE20’s would cost you $18,000, and forty SM7b’s could cost you $16,000, whereas forty of these XM1800S mics would only cost you around $500.
How do they sound? Surprisingly they sound very good for their price. And the supercardioid polar pattern helps minimize background noise.
In the past when I provided the microphone test-drive booth for Podcast Movement and NAB, I included one of these mics because it was good to hear the expensive mics compared to a mic this inexpensive.
Want to receive the Daily Goody in your email, daily or weekly? Subscribe free here.
And please keep in mind, the Daily Goody is only a tiny little tip, fact or lesson everyday. Please don’t expect any of these posts to be long, earth-shattering masterpieces that instantly answer every single question you can think of and completely transform you into a world class podcast engineer. “Little by little, a little becomes a lot.”
.
-
Diffraction
Have you ever spoken to a person in the next room when you couldn’t see them because your line of sight directly to them was blocked by a wall?
How were they able to hear you? Diffraction.
Basically diffraction is when sound waves (and other waves) bend around obstacles.
And it’s one of the main reasons why soundproofing a space is not easy.
Want to receive the Daily Goody in your email, daily or weekly? Subscribe free here.
And please keep in mind, the Daily Goody is only a tiny little tip, fact or lesson everyday. Please don’t expect any of these posts to be long, earth-shattering masterpieces that instantly answer every single question you can think of and completely transform you into a world class podcast engineer. “Little by little, a little becomes a lot.”
.
-
Listening to The Podcast Engineering Show
I try to give you lots of valuable information and insights on my show.
Have you ever gone back and re-listened to some episodes that you really liked?
I’m willing to bet that there are some nuggets of knowledge in there that you missed the first time. Sometimes it’s an off-hand comment by me or my guest, and sometimes it’s a concept that didn’t really “click” for you when you heard us talking about it the first time.
Anyhow, if you do re-listen to any episode let me know what you learned from it the second time hearing it.
Sound great!
YEAH OH YEAH
Want to receive the Daily Goody in your email, daily or weekly? Subscribe free here.
And please keep in mind, the Daily Goody is only a tiny little tip, fact or lesson everyday. Please don’t expect any of these posts to be long, earth-shattering masterpieces that instantly answer every single question you can think of and completely transform you into a world class podcast engineer. “Little by little, a little becomes a lot.”
.
-
Mastering Using Plugins on Your Master Buss
Instead of rendering your mix and then bringing it into another application like iZotope Ozone 8 and/or RX 7 to perform mastering, you could use plugins on the master buss of your multitrack DAW mix session to do some of the mastering right there. Of course you would still have to set the final LUFS level after rendering your “mastered mix.”
Want to receive the Daily Goody in your email, daily or weekly? Subscribe free here.
And please keep in mind, the Daily Goody is only a tiny little tip, fact or lesson everyday. Please don’t expect any of these posts to be long, earth-shattering masterpieces that instantly answer every single question you can think of and completely transform you into a world class podcast engineer. “Little by little, a little becomes a lot.”
.
-
Mouthclicks
Mouthclicks are the tiny clicks that are picked up by a microphone when it’s very close to a person’s mouth. They are created by saliva, lips, tongue, etc.
Some people have almost no mouth noises and other people have tons.
Causes:
- Dehydration, and surprisingly, over-hydration.
- Not projecting your voice enough. This brings down your voice-to-mouthclick ratio, which is why when people speak in a whisper really close to a microphone you will often hear lots of mouth noise (like in those ASMR videos).
Some people are almost “allergic” to hearing someone’s mouth noises and they will immediately turn off a podcast if someone on there has nasty mouthclicks and/or noises.
To get rid of mouth noises in post-production:
- iZotope RX has a module called Mouth De-click which is great for removing mouthclicks.
- And I recently tried a plugin called Spiff from Oeksound which can also remove mouthclicks and noises.
NOTE: You _could_ remove mouthclicks by hand in the editing process but if there are too many then this manual process becomes impractical.
Want to receive the Daily Goody in your email, daily or weekly? Subscribe free here.
And please keep in mind, the Daily Goody is only a tiny little tip, fact or lesson everyday. Please don’t expect any of these posts to be long, earth-shattering masterpieces that instantly answer every single question you can think of and completely transform you into a world class podcast engineer. “Little by little, a little becomes a lot.”
.
-
Chris’s Goody Bag and Two Clips – PES 130
Enjoy my brief overview of recent Daily Goody‘s (from March 29 – April 10). Here’s the link to view all those blog posts. And don’t forget that you can sign up to receive the Daily Goody in your email every day or once per week. Sign up here.
Here are the Daily Goody posts that we discussed in this episode:
- Samson Q2U Microphone
- Fission
- Behave as If You’re in a Recording Studio
- Some Audio Apps Will Not Recognize Inputs Beyond 1 and 2
- Doing Post-Production on Audio Recorded at a Live Event
- Reaper: How to Preserve Pitch When Speeding Up Playback
- iTunes Uses Fraunhofer
- Podcast Editors Business Entity and Taxes
- The “soothe” Plugin ROCKS!!!
- Audio Bit Depth
- Audio Daily Double – What Effect is This?
- Focusrite 6i6 Interface
Also hear:
- A clip of me calling Bob Bergey on the phone and him recording us both on his RØDECaster Pro.
- A clip of Addy Saucedo, author of The Podcast Planner, starting to interview me in the NAB podcast studio for her Modern Vintage Radio podcast. She decided not to use this interview because of audio quality issues. Hear for yourself.
A few announcements:
- The next semester of PES starts June 25, 2019.
- Upcoming episodes: Shawn Kitchen, Nick Dunkerley, Evo Terra, Dan Radin, Adam Gordon Bell, Travis Vengroff, Zach Moreno and Barry Gary!
I appreciate you listening, and if you have any questions please let me know 🙂
.
-
The Art of Fading Music
Generally speaking, the amateur fades out music too abruptly, usually using a “straight line” fade – a uniform reduction of the volume from full volume all the way to silence.
Using more gentle and transparent fades are the mark of a professional, and this usually means fading out the music more slowly as the volume approaches silence. In other words, start the fade with one slope, then midway through the fade adjust the slope to be more gentle, then near the end make it even more gentle.
And this applies in reverse to fading music in.
Of course, if you want to create an effect of music stopping abruptly or fading in quickly, you obviously can.
Want to receive the Daily Goody in your email, daily or weekly? Subscribe free here.
And please keep in mind, the Daily Goody is only a tiny little tip, fact or lesson everyday. Please don’t expect any of these posts to be long, earth-shattering masterpieces that instantly answer every single question you can think of and completely transform you into a world class podcast engineer. “Little by little, a little becomes a lot.”
.
-
Cloudlifter
The Cloudlifter provides up to +25dB of ultra-clean gain in two distinct stages and optimal impedance loading for dynamic and ribbon mics to perform their best. NOTE: It requires phantom power to function.
It and other similar devices are especially handy when using a microphones with relatively weak output ALONG WITH a mic preamp which doesn’t provide a lot of gain. (Like a Shure SM7b plugged into a cheap Behringer mixer, etc.)
To use it:
- Connect the output of the Cloudlifter to a preamplifier, mixer, or any other source that is capable of supplying phantom power.
- Connect your Passive microphone (dynamic, ribbon, crystal, or otherwise) to the input of the Cloudlifter. NOTE: It cannot and need not be used with microphones that require phantom power, like condenser mics; those mic’s usually have a strong enough output level not to need a boost from a Cloudlifter.
- Turn on phantom power.
Want to receive the Daily Goody in your email, daily or weekly? Subscribe free here.
And please keep in mind, the Daily Goody is only a tiny little tip, fact or lesson everyday. Please don’t expect any of these posts to be long, earth-shattering masterpieces that instantly answer every single question you can think of and completely transform you into a world class podcast engineer. “Little by little, a little becomes a lot.”
.
-
Attack and Release Times for Compression
Question from Chip:
I enjoyed your episode with Emily Prokop and learned some new tricks to use with Reaper.
I just got Scheps Omni Channel and I love it.
I’m trying to find out more about how to set attack and release times for compression. I’ve heard people use language like “fast attack” or “slow release” but I don’t understand how that translates to milliseconds.
Do you have a reference that lists a range of times for the different attacks and releases on a compressor?
I’ve asked the same question a few other places and I haven’t gotten a good answer. So I’m starting to suspect I’m coming at the issue from the wrong angle.
My current setting is an 11ms attack with a 110 ms release. I got it from an NPR guide and it seems to work.
Also, I recently learned that SWS extension will let me normalize audio to specific LUFS levels on reaper. To level my audio I normalize the whole thing to -24 LUFS then I put splits in after each phrase and normalize each clip to -24 LUFS. This results in a nicely leveled file.
I know this probably causes my noise floor to bounce around but I’m not sure it matters because I use an expander. If I add more than like 5 dB to a clip I add RX Voice De-noise just to that clip and adjust it so the noise sounds similar to the clip before and after it.
After everything is leveled to -24 LUFS I use a limiter to boost it up to -19 LUFS.
This seems to work for me but I don’t want to do something that would be considered bad engineering. I just do dialogue using the clip by clip method. I don’t use it on music.
I hope you are having a great weekend.
Answer from Chris:
Hi Chip! Good to hear from you.
Sounds like you’re doing just fine 😉
The attack time of a compressor will determine how much of the initial transient gets through before the compressor kicks in. Perceptually, this will allow the transients to “poke out” a bit more (longer attack) or not to poke out as much (shorter attack). Roughly, I would consider 0-10 ms very short, 10-35 ms medium, and 35+ ms long.
The release time of a compressor will determine how long it takes the compressor to completely deactivate after the sound goes below the threshold. Perceptually, and subtly, this will make the voice sound like it’s closer (shorter release) or further away (longer release). Roughly, I would consider 0-100 ms short, 100-500 ms medium, and 500+ ms long. Also, most compressors are capable of up to a 5000 ms release time; generally 2000-5000 ms release times are used to broadly level out a signal which is loud for a while, then quiet for a while, etc.
Also, normalizing each clip after you split up the original track is probably only necessary if the recording is extremely dynamic, meaning very loud at times and very soft at times; this is rare, but can happen when someone has terrible mic technique. If the original track is OK in this regard, you’d probably be OK just using a compressor or two on the entire track, which would save you time of splitting them up and normalizing separately, etc.
Hope this helps.
Want to receive the Daily Goody in your email, daily or weekly? Subscribe free here.
And please keep in mind, the Daily Goody is only a tiny little tip, fact or lesson everyday. Please don’t expect any of these posts to be long, earth-shattering masterpieces that instantly answer every single question you can think of and completely transform you into a world class podcast engineer. “Little by little, a little becomes a lot.”
.
-
Zencastr
Zencastr is a great way to connect with guests online and get a separate recording of each participant.
Like every.. single.. one.. of the other VoIP recording services, they have had a few issues in the past, but it’s a solid service that records good sounding audio – in fact better quality than any other comparable service that I could find.
Note about recording guests using services like this: Most of the problems that happen are because of participants who join — either they haven’t restarted their computer in 4 months, or they have an old computer, or a glitchy Windows machine, their dropbox is syncing, etc. So, to avoid potential problems, make sure your guests connect properly with a decent computer and restart it just before connecting.
Some features:
- Record in lossless .WAV format and/or .MP3
- Receive a separate track for each guest
- Optional automatic post-production to mix all participants audio
- A soundboard to insert your intro, ad, or other audio live as you record
Want to receive the Daily Goody in your email, daily or weekly? Subscribe free here.
And please keep in mind, the Daily Goody is only a tiny little tip, fact or lesson everyday. Please don’t expect any of these posts to be long, earth-shattering masterpieces that instantly answer every single question you can think of and completely transform you into a world class podcast engineer. “Little by little, a little becomes a lot.”
.
-
Backpack Studio App
Note: I have not tried this app yet, even though I bought it recently for around $10.
Backpack Studio is a mobile app for iOS allowing you to use an audio interface, record multiple tracks, play clips from a soundboard, mix, publish, and more.
Apparently you can connect a Focusrite 2i2 and other interfaces to your iOS device and record multitrack.
It has lots of features including:
- An automatic mixing function.
- Effects including compression, limiting, and EQ.
- An adjustable 0-100% ducking function to attenuate the volume of sound clips when someone speaks over them.
- Publish to various destinations right from the app.
- And more. (Like I said, I haven’t tried it yet)
Have you tried it? What was your experience?
Want to receive the Daily Goody in your email, daily or weekly? Subscribe free here.
And please keep in mind, the Daily Goody is only a tiny little tip, fact or lesson everyday. Please don’t expect any of these posts to be long, earth-shattering masterpieces that instantly answer every single question you can think of and completely transform you into a world class podcast engineer. “Little by little, a little becomes a lot.”
.
-
JBL LSR305 Monitors
These near-field monitors have gotten good reviews and they are not that expensive (around $300 for a pair).
Serious music engineers would not rate these as the very best, but for the money they are supposed to be very good near-field monitors.
Keep in mind that with near-field monitors, the frequency response is supposed to be flat in order for the engineer to properly mix.
When speakers have a subwoofer and tons of bass it is more difficult and, in fact, risky to mix audio on them alone. That’s why most music studios have 2-3 different pairs of monitors to allow the engineer to switch back and forth between the big huge bassy monitors and the accurate near-field monitors.
Want to receive the Daily Goody in your email, daily or weekly? Subscribe free here.
And please keep in mind, the Daily Goody is only a tiny little tip, fact or lesson everyday. Please don’t expect any of these posts to be long, earth-shattering masterpieces that instantly answer every single question you can think of and completely transform you into a world class podcast engineer. “Little by little, a little becomes a lot.”
.
-
The Envelope of Sound
In sound and music, an envelope describes how a sound changes over time.
There are four stages: attack, decay, sustain, and release.
As an example, here are the four stages with respect to pressing a piano key:
- Attack is the time taken for initial run-up of level from nil to peak, beginning when the key is pressed.
- Decay is the time taken for the subsequent run down from the attack level to the designated sustain level.
- Sustain is the level during the main sequence of the sound’s duration, until the key is released.
- Release is the time taken for the level to decay from the sustain level to zero after the key is released.
These four stages also apply to the way most dynamics processors such as expanders and compressors operate.
Want to receive the Daily Goody in your email, daily or weekly? Subscribe free here.
And please keep in mind, the Daily Goody is only a tiny little tip, fact or lesson everyday. Please don’t expect any of these posts to be long, earth-shattering masterpieces that instantly answer every single question you can think of and completely transform you into a world class podcast engineer. “Little by little, a little becomes a lot.”
.
-

Glenn the Geek, from Horse Radio Network and Finding Florida – PES 129
My guest is Glenn the Geek – founder of the Horse Radio Network (founded July 2008), cohost of Horses in the Morning, cohost of Finding Florida, and cofounder of the Florida Podcast Network.
Every morning he livestreams Horses in the Morning like this:
- Audio only livestream via Blogtalk originally, now via Mixlr.
- Has a 5 computer setup.
- Call-in Studio to take live phone calls via Skype.
- The master Live feed is sent out through Mixlr, which streams through their own app, as well as players embedded on their website.
- Producer sets up guests off-air.
- Hosts and producer chat privately using Skype.
- The final audio podcast is published within 30 minutes after finishing the Livestream.
- Uses a 12 year old Belkin mixer (still, after trying a few newer mixers).
- Uses ATR2100’s or the Behringer XM1800’s.
- All PC’s, no Mac’s.
- Uses Total Recorder to record Skype.
- Uses Mixcraft to edit.
- Uses Auphonic to run all episodes through, to tag and send to destinations.
- Plays sound clips via iTunes.
For the on-location recording of Finding Florida:
- Go to a place and do ten activities in 3-4 days and record everything.
- For interviews, they record with a Tascam DR-05 and two XM1800 microphones.
- They also record on their phones (as a backup while recording with the DR-05) using the Hi-Q app on Android to record and immediately upload to Dropbox.
- There exists audio of Glenn breaking his ribs in the Daytona beach episode of Finding Florida!
- Post-production of episodes using Mixcraft to add music, transitions, etc.
Other hosts on the Horse Radio Network:
- All connect with and record guests using Skype.
- Use Google Sites for production notes.
- Are all hosts streaming Live? No.
*I asked Glenn if he ever recorded audio of any of his horses. He said YES – and he played some clips in this episode!
Thanks for being a great guest, Glenn!
Comment below with any questions or comments.
.
-
Play Audio Games at SoundGym
SoundGym describes themselves as “The Gym for your Ears: Get audio ear training online, improve core listening skills like frequency detection or compression, and start sounding like a pro. Anytime, anywhere. Let’s start training!”
They offer some training for free and a lot more if you pay.
Want to receive the Daily Goody in your email, daily or weekly? Subscribe free here.
And please keep in mind, the Daily Goody is only a tiny little tip, fact or lesson everyday. Please don’t expect any of these posts to be long, earth-shattering masterpieces that instantly answer every single question you can think of and completely transform you into a world class podcast engineer. “Little by little, a little becomes a lot.”
.
-
Increasing the Apparent Loudness of Your Final Episodes
Before adjusting the final level of your episodes to be the standard -19 LUFS (mono) or -16 LUFS (stereo), you can use some compression and/or limiting on the final mix to make it seem louder. It will also reduce the dynamic range (the volume difference between loud parts and soft parts).
Want to receive the Daily Goody in your email, daily or weekly? Subscribe free here.
And please keep in mind, the Daily Goody is only a tiny little tip, fact or lesson everyday. Please don’t expect any of these posts to be long, earth-shattering masterpieces that instantly answer every single question you can think of and completely transform you into a world class podcast engineer. “Little by little, a little becomes a lot.”
.